As the holiday season approaches, it’s time to start thinking about festive decorations that will bring joy and warmth to your home. Among the most beloved Christmas traditions is the display of a nativity scene, which depicts the birth of Jesus Christ. This year, why not create a unique and meaningful nativity scene using a Nativity Scene Shadow Box SVG?
What is a Nativity Scene Shadow Box SVG?


As the holiday season approaches, it’s time to start thinking about festive decorations that will bring joy and warmth to your home. Among the most beloved Christmas traditions is the display of a nativity scene, which depicts the birth of Jesus Christ. This year, why not create a unique and meaningful nativity scene using a Nativity Scene Shadow Box SVG?

How to Create a Nativity Scene Shadow Box
To create a Nativity Scene Shadow Box, you will need the following materials:
- Free Shadow Box SVG File Create Stunning Shadow Boxes With Our Free SVG File
- Halloween Shadow Box SVG Free Halloween Shadow Box SVG Free: Spooktacular Creations For Your Home Decor
- Christmas 3d Shadow Box SVG Christmas 3D Shadow Box SVG: Unleash Your Creativity And Holiday Spirit
- Cricut Butterfly Shadow Box Cricut Butterfly Shadow Box: A Stunning Display Of Delicate Beauty
- Free Lightbox SVG Files Free Lightbox SVG Files: A Comprehensive Guide
- Nativity Scene Shadow Box SVG file
- Cutting machine (such as a Cricut or Silhouette)
- Cardstock or other cutting material
- Shadow box frame
- Glue or adhesive
- Optional: paint, markers, or embellishments
What is a Nativity Scene Shadow Box SVG?
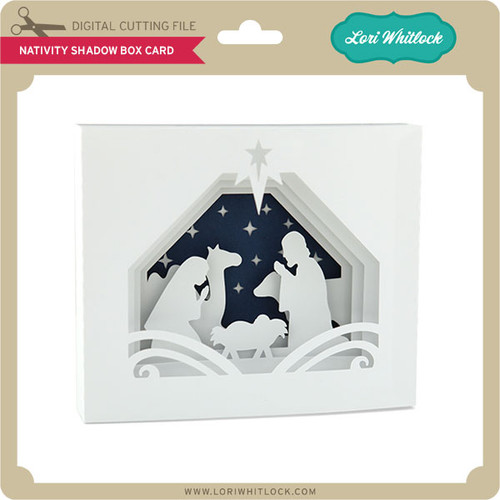
A Nativity Scene Shadow Box SVG is a digital file that contains the outlines of a nativity scene, including the figures of Mary, Joseph, the baby Jesus, the shepherds, and the wise men. These outlines can be cut using a cutting machine, such as a Cricut or Silhouette, and layered together to create a three-dimensional nativity scene within a shadow box frame.
Benefits of Using a Nativity Scene Shadow Box SVG
There are many benefits to using a Nativity Scene Shadow Box SVG:


Step 1: Cut the Nativity Scene SVG
Upload the Nativity Scene Shadow Box SVG file to your cutting machine software and adjust the size and settings as needed. Cut the outlines from cardstock or other cutting material.
Step 2: Layer the Nativity Scene
Start by gluing the background layer of the nativity scene to the back of the shadow box frame. Then, layer the figures and other elements of the nativity scene on top, using glue or adhesive to secure them.
Step 3: Add Embellishments (Optional)
Once the nativity scene is assembled, you can add any embellishments you like, such as paint, markers, or glitter. This is a great way to personalize your nativity scene and make it truly unique.
FAQ
Q: What size should I make my nativity scene shadow box?
A: The size of your nativity scene shadow box will depend on the size of your cutting machine and the space you have available. A common size is 8×8 inches or 12×12 inches.
Q: What type of cardstock should I use?
A: For best results, use a heavy-duty cardstock that is at least 65 lb. weight.
Q: Can I use other materials besides cardstock?
A: Yes, you can also use other materials such as wood, acrylic, or metal. However, you may need to adjust the settings on your cutting machine accordingly.
Q: How do I hang my nativity scene shadow box?
A: Most shadow box frames come with a built-in hanger. You can also use command strips or picture wire to hang your nativity scene shadow box.
Conclusion
A Nativity Scene Shadow Box SVG is a wonderful way to create a unique and meaningful Christmas decoration that will be cherished for years to come. With its easy-to-use design and endless customization options, you can create a nativity scene that perfectly reflects your personal style and the spirit of the holiday season.