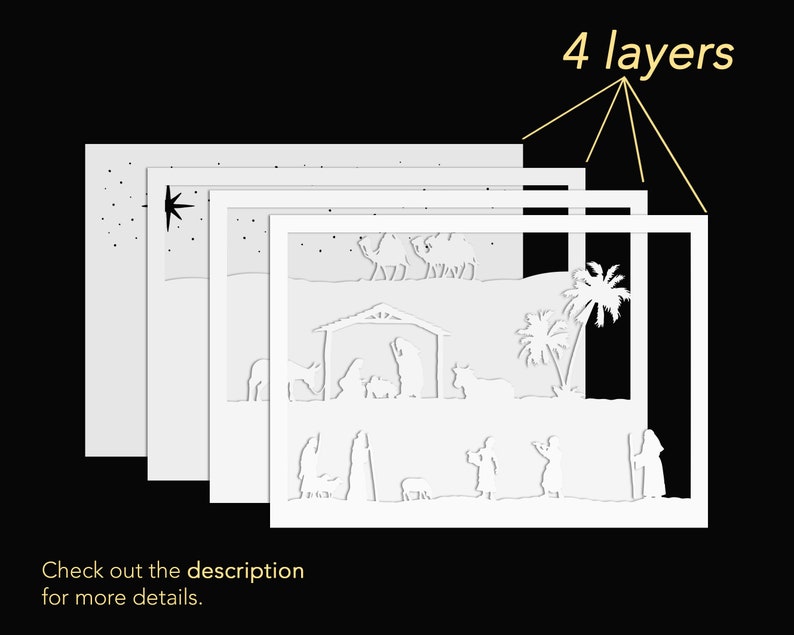
As the holiday season approaches, it’s time to start thinking about how you’re going to decorate your home. If you’re looking for a unique and festive way to display your favorite Christmas memories, then you’ll love this layered Christmas shadow box SVG file.
This free SVG file comes with everything you need to create a beautiful layered shadow box, including the box itself, the backing paper, and the cut files for all of the layers. The layers are designed to be cut from different colors of cardstock, so you can customize the look of your shadow box to match your own personal style.
Table of Content
As the holiday season approaches, it’s time to start thinking about how you’re going to decorate your home. If you’re looking for a unique and festive way to display your favorite Christmas memories, then you’ll love this layered Christmas shadow box SVG file.
- Layered Christmas shadow box SVG file
- Cardstock in various colors
- Foam adhesive
- Glue
- Ribbon or other embellishments (optional)
Instructions
This free SVG file comes with everything you need to create a beautiful layered shadow box, including the box itself, the backing paper, and the cut files for all of the layers. The layers are designed to be cut from different colors of cardstock, so you can customize the look of your shadow box to match your own personal style.
- Shadow Box SVG Files Shadow Box SVG Files: A Comprehensive Guide
- Halloween Shadow Box SVG Halloween Shadow Box SVG: Unleashing Your Spooky Creativity
- Harry Potter Lightbox SVG Harry Potter Lightbox SVG: A Luminous Guide To The Wizarding World
- Christmas Shadow Box Free SVG Christmas Shadow Box: A Festive And Personalized Holiday Decoration
- Harry Potter Shadow Box SVG Free Harry Potter Shadow Box SVG: A Magical Keepsake To Treasure
Once you’ve cut out all of the layers, it’s time to assemble the shadow box. Start by gluing the backing paper to the inside of the box. Then, layer the cut files on top of the backing paper, starting with the bottom layer and working your way up. Be sure to use foam adhesive between the layers to create a 3D effect.
Once you’ve assembled the shadow box, you can add your own personal touches. You can add photos, Christmas cards, or other small mementos to the inside of the box. You can also decorate the outside of the box with ribbon, bows, or other embellishments.
This layered Christmas shadow box is a great way to display your favorite holiday memories. It’s also a fun and easy project that the whole family can enjoy. So gather your supplies and get started today!
Materials You’ll Need
- Download the layered Christmas shadow box SVG file.
- Cut out all of the layers from cardstock.
- Glue the backing paper to the inside of the box.
- Layer the cut files on top of the backing paper, starting with the bottom layer and working your way up.
- Use foam adhesive between the layers to create a 3D effect.
- Add your own personal touches to the inside and outside of the box.


Tips
- Use different colors of cardstock to create a unique and festive look.
- Add photos, Christmas cards, or other small mementos to the inside of the box.
- Decorate the outside of the box with ribbon, bows, or other embellishments.
- This project is a great way to get the whole family involved in the holiday festivities.
FAQs
- What size shadow box should I use?
The size of the shadow box you use will depend on how many layers you want to include and how much space you have available. A good rule of thumb is to use a shadow box that is at least 8 inches wide and 10 inches tall.
- What type of cardstock should I use?
You can use any type of cardstock you like, but I recommend using a medium-weight cardstock that is at least 65 lb. This will help to ensure that the layers are sturdy and won’t warp or bend over time.
- How do I cut out the layers?
You can use a craft knife or a cutting machine to cut out the layers. If you’re using a craft knife, be sure to use a sharp blade and cut slowly and carefully. If you’re using a cutting machine, follow the manufacturer’s instructions for cutting cardstock.
- How do I assemble the shadow box?
Start by gluing the backing paper to the inside of the box. Then, layer the cut files on top of the backing paper, starting with the bottom layer and working your way up. Be sure to use foam adhesive between the layers to create a 3D effect.
- How do I add my own personal touches to the shadow box?
You can add your own personal touches to the inside and outside of the box. You can add photos, Christmas cards, or other small mementos to the inside of the box. You can also decorate the outside of the box with ribbon, bows, or other embellishments.