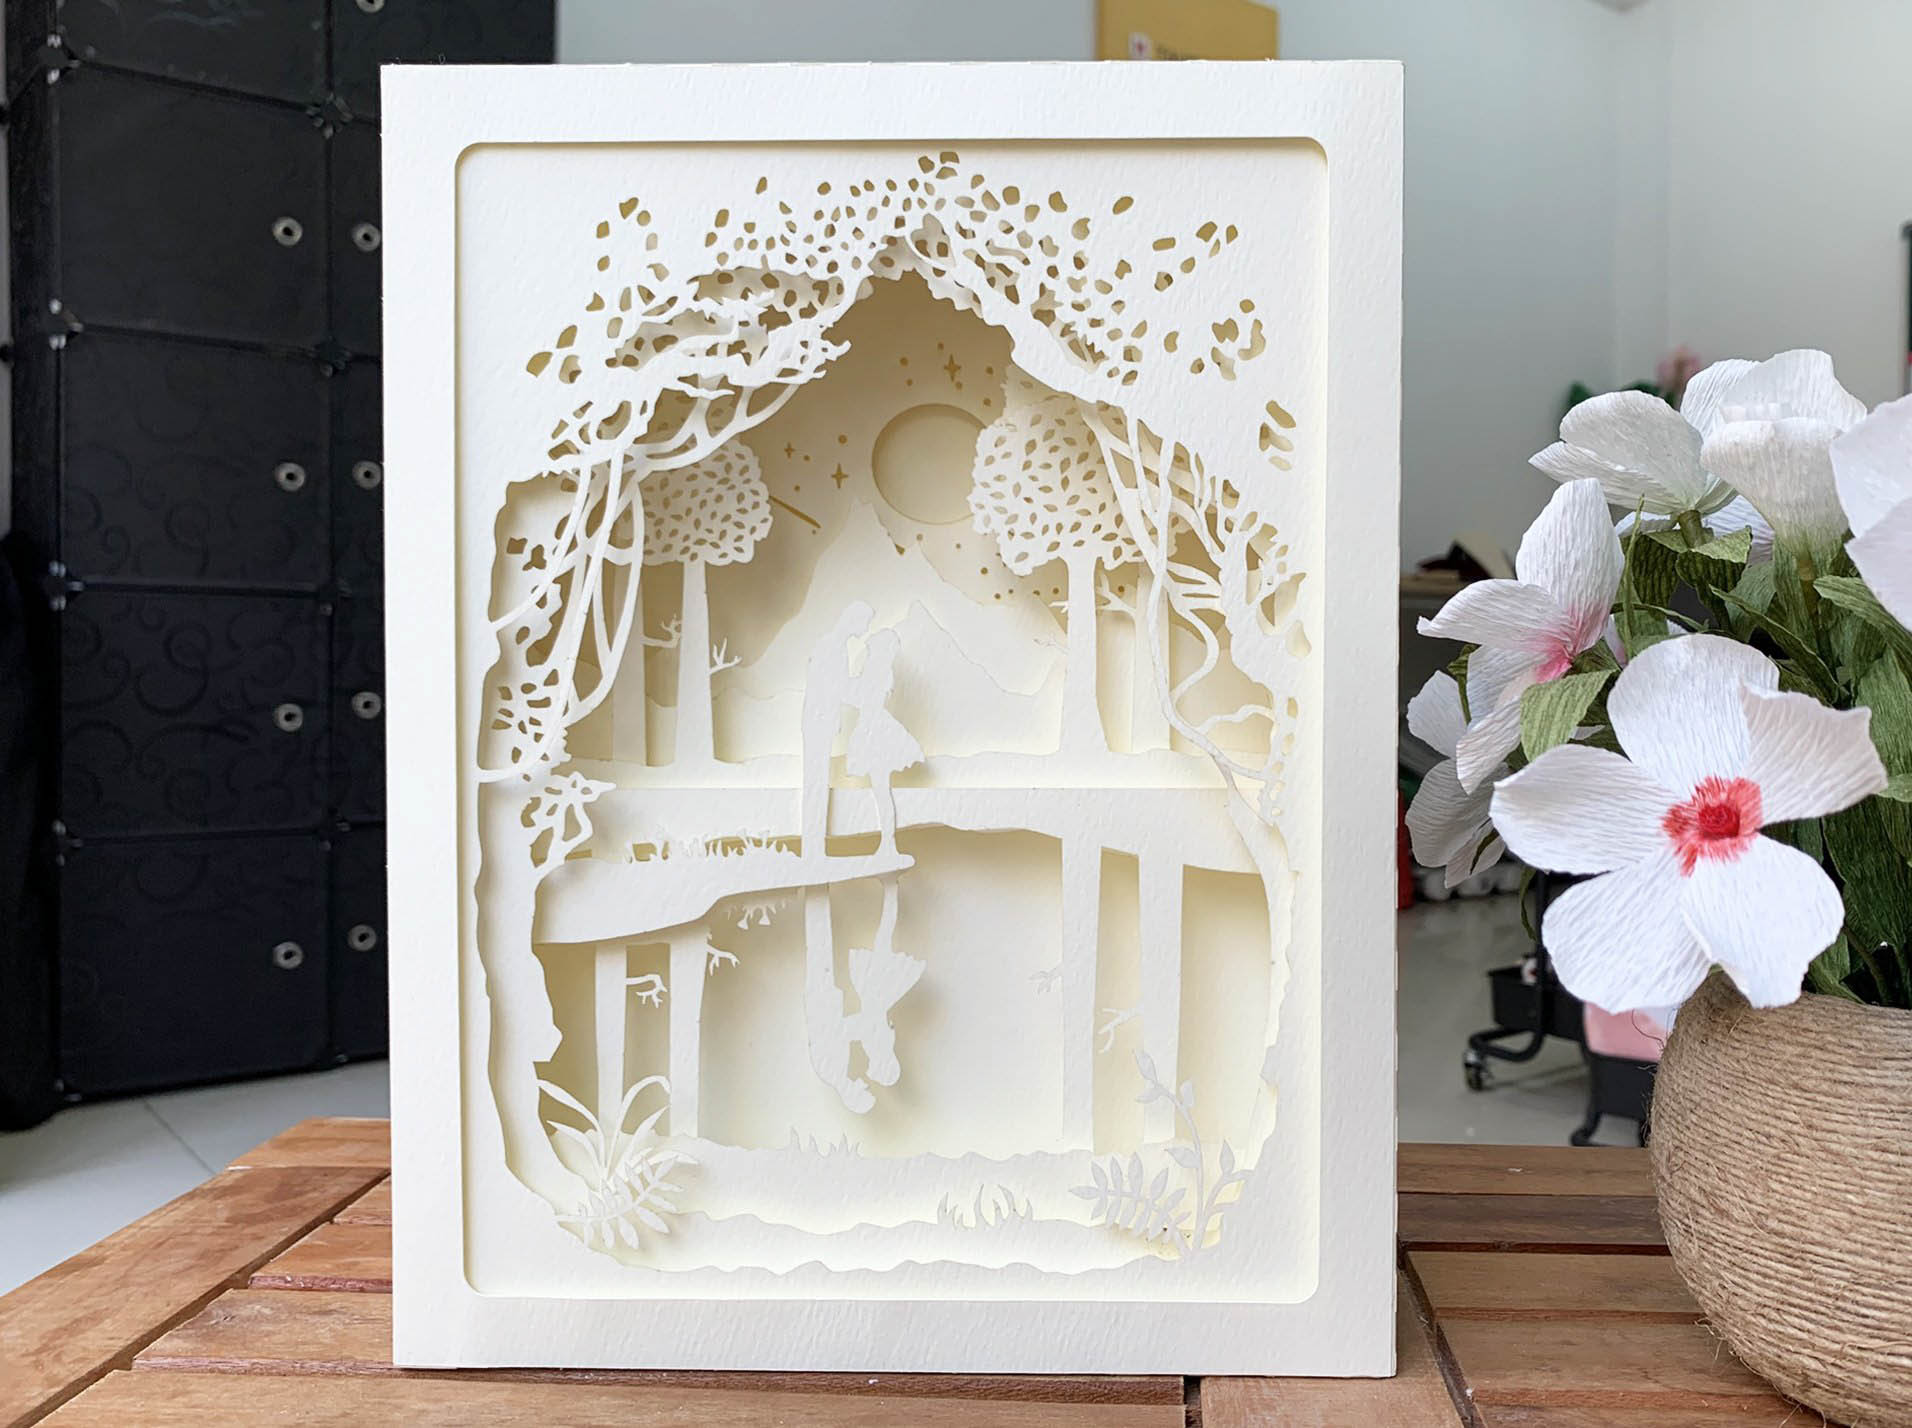
In the realm of papercrafting, layered shadow boxes stand out as captivating masterpieces, offering a unique blend of depth, dimension, and endless creative possibilities. These intricate creations are crafted by meticulously layering multiple sheets of cardstock or paper, creating an illusion of depth and dimension that transforms cherished memories, artwork, and special keepsakes into captivating displays.
Whether you’re a seasoned crafter or just starting your papercrafting journey, layered shadow boxes present an exciting opportunity to showcase your creativity and preserve precious moments in a truly captivating way. With a few essential tools, some imagination, and the versatility of a Cricut cutting machine, you can craft stunning shadow boxes that will add a touch of elegance and charm to any space.

In the realm of papercrafting, layered shadow boxes stand out as captivating masterpieces, offering a unique blend of depth, dimension, and endless creative possibilities. These intricate creations are crafted by meticulously layering multiple sheets of cardstock or paper, creating an illusion of depth and dimension that transforms cherished memories, artwork, and special keepsakes into captivating displays.
Getting Started:
-
Choose a Shadow Box Frame: Select a shadow box frame that complements the size and theme of your project. The depth of the frame will determine the number of layers you can create.
Whether you’re a seasoned crafter or just starting your papercrafting journey, layered shadow boxes present an exciting opportunity to showcase your creativity and preserve precious moments in a truly captivating way. With a few essential tools, some imagination, and the versatility of a Cricut cutting machine, you can craft stunning shadow boxes that will add a touch of elegance and charm to any space.
- Free Cricut Shadow Box Template Discover The Ultimate Guide To Free Cricut Shadow Box Templates For Limitless Creativity
- Free Shadow Box SVG File Create Stunning Shadow Boxes With Our Free SVG File
- Halloween Shadow Box SVG Free Halloween Shadow Box SVG Free: Spooktacular Creations For Your Home Decor
- Free Disney Shadow Box SVG Free Disney Shadow Box SVG: Capture The Magic Of Your Favorite Characters
- 3d Light Box SVG Elevate Your Home Décor With The Enchanting 3D Light Box SVG
Materials You’ll Need:
- Cardstock or paper in various colors and textures
- Shadow box frame
-
Design Your Layers: Use a design software (such as Cricut Design Space) to create the shapes and designs for your shadow box layers. Consider the overall composition and how each layer will contribute to the final look.
-
Cut the Cardstock: Load the cardstock into your Cricut cutting machine and cut out the desired shapes and designs. Ensure that the cuts are precise and clean.
-
Assemble the Layers: Apply adhesive to the back of each cardstock layer and carefully layer them inside the shadow box frame. Start with the back layer and work your way forward, creating depth and dimension with each layer.
-
Add Embellishments: Enhance your shadow box with embellishments such as ribbons, beads, sequins, or stickers to add a touch of sparkle and personalization.

Tips for Creating Stunning Layered Shadow Boxes:
-
Use a Variety of Cardstock: Experiment with different colors, textures, and patterns of cardstock to create a dynamic and visually appealing display.
-
Consider the Depth: The depth of your shadow box will determine the number of layers you can create. Plan your design accordingly to ensure that the layers fit comfortably within the frame.
-
Layer for Dimension: Each layer should add depth and dimension to the overall design. Use thicker cardstock for the back layers and gradually use thinner cardstock for the front layers to create a sense of perspective.
-
Add Lighting: Incorporate LED lights or battery-operated fairy lights into your shadow box to illuminate the layers and create a magical ambiance.
-
Personalize It: Make your shadow box truly unique by adding personal touches such as photos, handwritten notes, or meaningful objects that hold special significance.
Frequently Asked Questions (FAQs):
Q: What is the best type of cardstock to use for layered shadow boxes?
A: Acid-free cardstock is recommended to prevent yellowing and deterioration over time. Cardstock with a weight of 65-110 lbs is ideal for layering.
Q: How can I prevent the layers from warping?
A: Use a spray adhesive or mounting squares to firmly adhere the layers together. Avoid using liquid glue, as it can cause warping.
Q: Can I use other materials besides cardstock?
A: Yes, you can use other materials such as fabric, vellum, or thin wood veneers to add texture and variety to your shadow box layers.
Q: How do I mount the shadow box on a wall?
A: Use picture hanging strips or D-rings to securely mount the shadow box on a wall. Ensure that the wall is strong enough to support the weight of the frame.
Q: Can I create layered shadow boxes without a Cricut machine?
A: Yes, it is possible to create layered shadow boxes by hand-cutting the cardstock and layering them manually. However, using a Cricut cutting machine will provide more precision and efficiency.
Conclusion:
Layered shadow boxes are a versatile and captivating way to showcase cherished memories, artwork, and special keepsakes. With the right materials, a touch of creativity, and the convenience of a Cricut cutting machine, you can craft stunning shadow boxes that will become treasured keepsakes for years to come. Whether you’re preserving family photos, displaying your children’s artwork, or creating a unique gift for a loved one, layered shadow boxes offer endless possibilities for personalization and artistic expression.
